TEE PROBE LEAK TEST BECOMES MANDATORY DECEMBER 31, 2015…ARE YOU READY?
Back in July 2013, one of the revisions to the IAC Standards and Guidelines included “the structural and electrical integrity of the transducer must be checked between each use, using an ultrasound transducer leakage tester.” This revision becomes effective December 31st, 2015. That’s great, but why do we have to do this? What is a leakage tester? How does it work? Where can I get one?
STANDARD
Let’s start by reviewing the IAC Standards. Performing electrical checks of TEE probes ensures electrical safety and prevents harm to both sonographers and patients. The IAC Standard (2.2.3B) will require TEE probe electrical checks between each use starting December 31st, 2015. According to the standard, “Passed” or “Failed” must be recorded in the routine TEE probe cleaning/maintenance log along with action taken if “Failed”.
HOW DO I PERFORM A LEAKAGE TEST?
Thankfully, this procedure is simple and can easily be made an automatic process in your lab.
Overview
Step One:
The first step is to purchase the vendor specific leakage tester for your TEE probe.
Step Two:
Once you have the equipment you can easily implement the use of it into any step of your current cleaning protocols. Remember, testing just requires that the probe to be sitting in a liquid to complete the electrical leakage test. You can test the probe while it’s soaking in the enzymatic cleaner OR while it’s soaking in water.
Step Three:
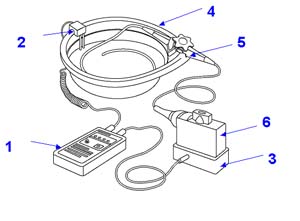
Plug the connector port into the Leakage Tester and place the electrode from the Leakage tester into the water.

(1) Basin (2) TEE probe with only the shaft immersed and the handle safely outside the basin (3) Transducer Port Plugin (4) Leakage Tester (5) Dual Electrode
Formal Procedure
So now you understand the 3 steps involved to implementing Leakage Testing the next step would include writing a formal policy and procedure and training staff. Here is an example of how your policy can address checking the structural and electrical integrity of the transducer.
Electrical and Structural Testing Procedure
- Pre-clean the TEE probe according to your manufacturer’s guidelines.
- Inspect the TEE probe for signs of damage:
- Lens: Separating from housing, multiple holes, or swollen
- Connector: Bent pins, dents in housing, dirty
- Bending rubber (Flexible shaft): Contaminated or stained, holes and most common, bite marks
- Cable: Pulled out, strain relief, tears, scratches, faded labeling
- Fill the TEE basin (or cylinder, whatever container you soak your probe in) to the level indicated with a saline or enzyme solution that will conduct electricity.
- Place just the Flexible shaft of the TEE probe into the enzymatic solution/saline bath, fully immersing the shaft BUT NOT THE control housing (handle), cable or connector housing
- Place the tester’s dual electrode at least one inch into the enzymatic solution/saline bath.
- Perform conductivity test: Turn test button on. Move switch to Conductivity and click test button again.
- Green light means passed.
- Red light means failed. If conductivity fails, make sure that electrodes are at a depth of 1 inch and everything is firmly connected. Try again. If conduction test fails, do not attempt leakage test. Notify Biomed and or troubleshoot per manufacturer instructions.
- Only if Conduction test passes: Perform leakage test. Move switch to leakage and click test button.
- Green light means passed.
- Red light means failed.
- If Leakage test fails check all equipment and try again to ensure it wasn’t a procedural error. If Leakage test continues to fail remove the probe from patient care and immediately notify Biomed and or the field engineer.
CASE STUDY
We interviewed the biomedical manager at a hospital in South Florida. He implemented electrical testing three years ago in their facility.
When and why was electrical testing implemented?
The facility was constantly fixing or replacing TEE probes and he realized that damage to the probe was occurring before symptoms of the damage could be seen. This included tiny bite holes undetectable by the eye that after multiple soakings this left the TEE probe unusable. After replacing their probes three times, their warranty was no longer valid and they had to pay $14,000 to replace the probe. A month and a half later it happened again so they implemented electrical testing.
How was testing implemented?
The biomed manager’s goal in addition to ensuring compliance was to make the testing a mindless task, that would be completed automatically. The leak tester they had was complex and not very easy to use and the hospital uses TEE transducers from multiple vendors. He mounted the tester in the sterilization room and modified the sterilization tube to sit on the electrical connector. He also purchased a universal adaptor for the tester that allows many different vendor probes to be tested on it. Now, the tester just has to connect the transducer to the universal converter, dip the tip of the probe into the modified sterilization tube full of water and run the test. The tester is immediately notified if it is “Pass” or “Fail.”
SUMMARY
Mandatory testing is coming so start preparing now by making sure you have proper equipment, procedures and training for your facility. IAC presented an excellent webinar on this very subject and we have provided a link to their PowerPoint. If you have any questions reach out to your biomed department, ultrasound equipment vendor or sterilization department


