Last Updated on October 29, 2025 by Don Gerig, RDCS
Last week guest writers Dr. Ali and Dr. Nossikoff explained what an agitated saline “Echo Bubble study” is. They provided 7 indications for an echo bubble study along with a review of how to interpret the findings. If you missed last week’s blog, check it out! This week both doctors will teach us 9 steps to perform an echo bubble study along with supplies needed and tips to optimize imaging.
- Educator Spotlight: Dr. Ahmed Ali
- Educator Spotlight: Dr. Alexander Nossikoff
- 7 Indications for an Echo Bubble Study
Echo Bubble Study Recap
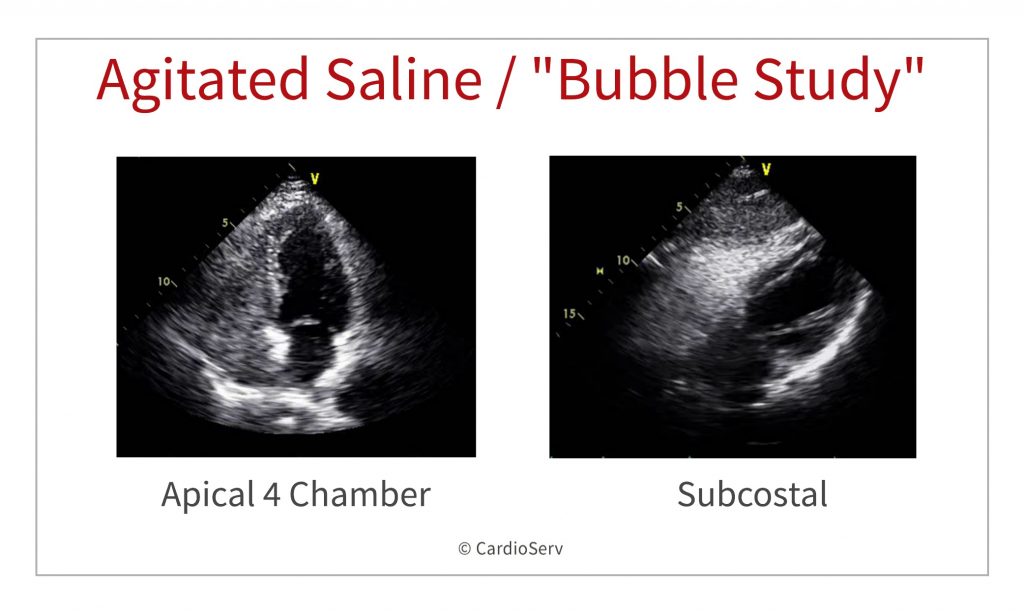
Agitated saline, or an echo “bubble study” is often a neglected complementary echocardiographic technique. An Echo Bubble Study is an injection of saline after agitation with air to create micro-bubbles that are ultrasound reflective into a vein in order to reach and opacify the right heart chambers, the coronary sinus in cases of persistent left superior vena cava (PLSVC), or the pericardium during pericardiocentesis.
Supplies Needed For a Bubble Study
You’ll need the following items to prepare and perform an agitated saline contrast (bubble) study:
- IV Cannula
The exact size isn’t as critical as in contrast CT, but a 20-gauge or larger cannula makes forceful injections easier and reduces the risk of vein rupture. The key is to inject rapidly and forcefully immediately after agitation.
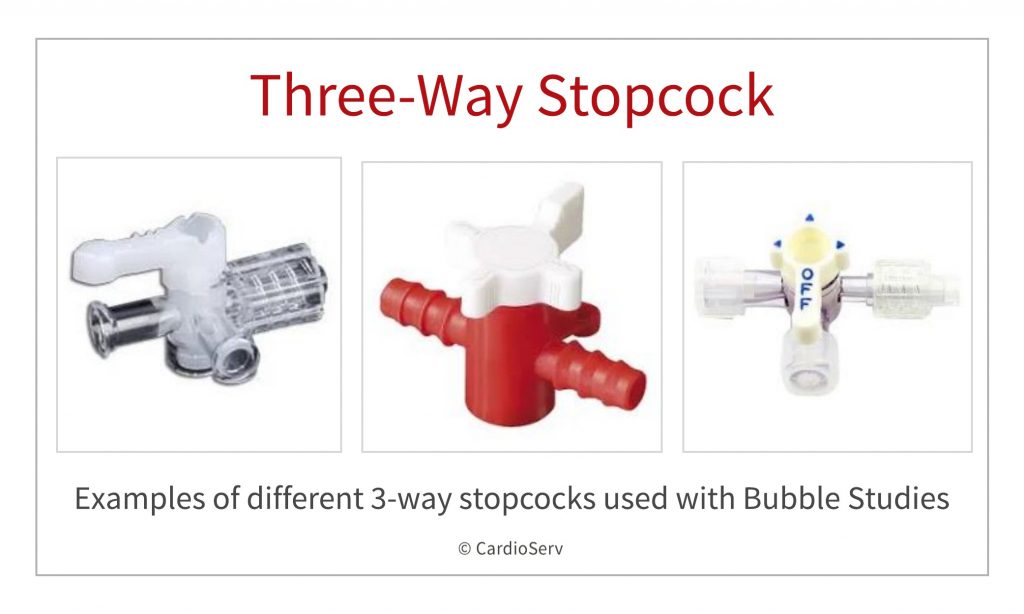
Tip: If you plan to withdraw blood (see below), do so right after inserting the IV cannula directly into one of the syringes. - Three-Way Stopcock
Essential for connecting the syringes and agitating the saline between them to generate microbubbles. - At Least Two 10 mL Syringes
Use syringes with a locking mechanism to prevent leakage during forceful injections.
Having 4–5 syringes prepared is ideal since repeated injections may be needed and it’s best practice to withdraw blood early. - Normal Saline (0.9%)
The base fluid used for bubble formation. - Extension Tube Connector (Optional)
Helpful for operator comfort and flexibility, especially when working without an assistant. - Gelofusine (Optional)
Mixing saline with Gelofusine (usually 50:50) enhances contrast appearance, though it may increase shadowing or persistence time. - Assistance (Optional)
A second operator or nurse can help with injections, allowing the primary sonographer to focus on image acquisition. This is especially useful during timing-critical injections or Valsalva maneuvers.
How To Perform and Echo Bubble Study (Agitated Saline)
Bubble Study Echo Protocol
Step-by-step guide for preparing, agitating, and injecting agitated saline during echocardiography to evaluate shunts such as PFO. For trained clinical personnel.
- Prepare materials
Gather ultrasound system, two 10 mL syringes, normal saline, optional Gelofusine, three-way stopcock, IV cannula, extension tubing, and standard IV supplies.
- Fill syringe with saline or saline–Gelofusine mix
Fill one syringe with 8–9 mL normal saline. Optionally mix 50:50 with Gelofusine (4–4.5 mL each). Gelofusine enhances opacification but may cause distal shadowing and longer persistence, especially with TR.
- Place IV cannula
Insert an IV cannula into an antecubital vein on the arm most convenient for injection. Use the left arm if demonstrating a persistent left superior vena cava. Leg vein injections are rarely used today.
- Withdraw small amount of blood (if not using Gelofusine)
Withdraw 0.5–1 mL of blood into the saline-filled syringe to enhance contrast if Gelofusine is not used. Skip this step if Gelofusine is used.
- Attach stopcock and flush extension
Connect the three-way stopcock to the cannula directly or via a pre-flushed extension tube. Flush the extension with saline before connecting the syringe containing blood.Withdraw 0.5–1 mL of air into the second syringe. If no blood was withdrawn, you may add the air to the same syringe with the saline/Gelofusine mix.
- Withdraw air in second syringe
Withdraw 0.5–1 mL of air into the second syringe. If no blood was withdrawn, you may add the air to the same syringe with the saline/Gelofusine mix.
- Agitate to create microbubbles
Connect both syringes to the stopcock and move the fluid forcefully back and forth 3–4 times. Finish with one strong push to maximize bubble density before injection.
- Inject during optimal echo view
When the echocardiographic view is optimal, rapidly and forcefully inject the agitated saline. Keep syringe parallel to the vein/extension and briefly squeeze the forearm to enhance venous return and RA opacification.
- Perform Valsalva if first injection is negative
If the first injection (without Valsalva) is positive, no further images are needed. If negative, have the patient perform a Valsalva maneuver while injecting agitated saline just before release. The strain should last about 10 seconds; releasing causes a brief right-to-left shunt for PFO detection.
SAFETY OF AGITATED SALINE IN ECHO
Agitated saline injection is safe with very few (if any) side effects that are mostly related to injection site.
Traditionally, agitated saline use has been considered contraindicated if right-to-left shunting is known or suspected due to presumed risks of systemic air-embolism. However, it is well known that some degree of right-to-left-shunt is present in about 25-30% of healthy young population due to PFO. Actually, detection of PFO is the most common indication for doing agitated saline study. Data from large American databases shows that cerebro-vascular accidents caused by agitated saline injections used for PFO detection are extremely rare and frequently without long-term consequences. Use of gelofusine has been associated with rare cases of hypersensitivity reactions, but most experienced operators have never observed any so the rate should be very low.
A very simple safety tip for diminishing the amount of air entering the circulation can be used when performing agitated saline injections – bend the syringe tip down and the plunger up during injection (this is particularly easy when using extension tube), this way the air will stay up near the plunger, stop the injection when close to the last 2ml.
Final Thoughts and What’s Next
In conclusion; agitated saline is a cheap, safe and easy to perform technique with lots of added information when properly used. Last week we reviewed the 7 Indications for a bubble study along with how to perform and interpret the findings. This week we reviewed how to perform an echo bubble study. Next week we will provide 6 tips to improve image quality when performing an echo bubble study. We would like to thank our guest writers this week.
Read To Go Deeper?
Enroll in the “The Why and How of Echo Bubble Studies” course from CardioServ. Learn how to correctly perform an echo bubble study, recognize false-positives and negatives, and detect shunts such as PFO, PLSVC, and PAVM. Earn 2.5 CME credits while elevating your bubble study knowledge.
If you are interested in being a guest writer, please contact us